
The debate over the need for a skeg on your kayak is ongoing. There are times when they are necessary and times when they are not.
Let’s look at what a skeg on a kayak is, how to use one, and how to install a skeg if you want one.
Skeg Definition
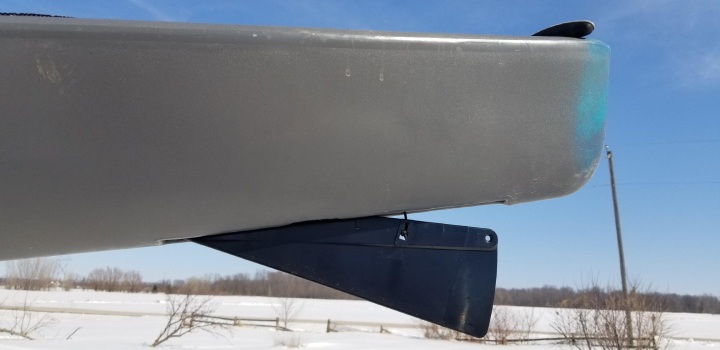
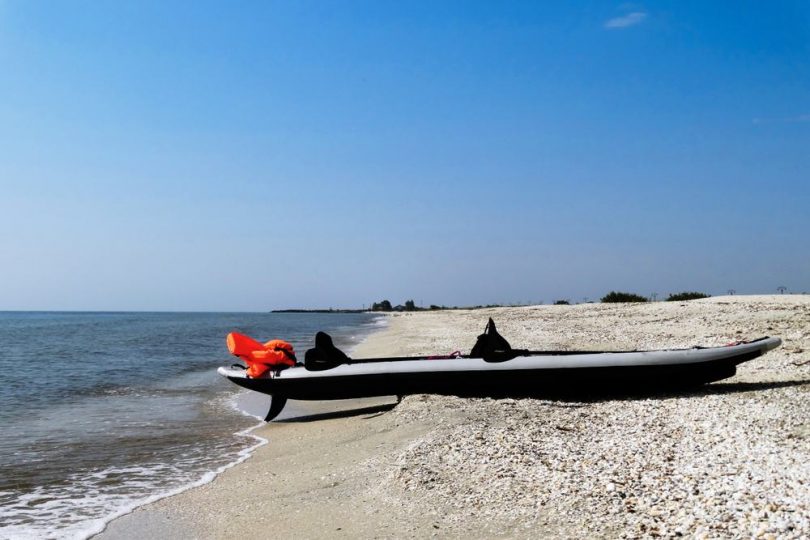
A skeg is used in a crosswind to keep the kayak moving in a straight line. It is stored in a box in the kayak’s stern, using a slider to pull it in and out of the water when needed.
The deeper in the water it goes, the straighter the boat will weathercock (turn into the wind.)
Why you need a Skeg for Your Kayak
A skeg is used to keep your kayak from turning into the wind (weathercocking), making paddling in windy conditions easier and less tiresome.
Skeg Pros
- Improves how the kayak handles high winds, though not as well as a rudder
- Placement under the kayak decreases collision damage (as long as you lift them in shallow water and back paddling)
- You can’t see them; the eye appeal of the kayak is maintained
- Has fewer moving parts and connection points
- Decreases the chance of leaking water since fewer holes are needed to install it
- Will not catch the wind; stored under the boat
- Unlike the rudder, it isn’t affected as the stern comes up from the water
- No leg and toe control is needed; you can use your body contact to shift the kayak as needed
- Its position on the boat decreases the chance of it getting broken
- It doesn’t get in the way of self-rescue attempts
- Designed to move upward when they hit something
- It is out of the way when stored and can’t get snagged in the wind (like a rudder)
Skeg Cons
- Small stones can get stuck and jam the skeg
- Unjamming a skeg using the slider can create serious cable problems
- Skeg box takes up too much of the hatch’s storage area
- Doesn’t prevent the kayak from twisting
- Causes more drag than a clean hull
- Requires the kayak user to know how to control the kayak, especially when the kayak turns
- Gets damaged if the kayak sideswipes an object (won’t happen often!)
Skeg Recommendations
Mini kayak skeg
Are a tool-less installation requiring marine glue—the eight-inch fin stores in the mounting platform and locks in place. The mounting platform can be removed from the kayak at any time.
Small kayak skeg
The 2.75-inch fin offers you controlled paddling in shallow water. It is glued to the kayak with marine glue. Once attached it is not removable.
Kayak Skeg Tracking Fin
It is also a tool-less installation requiring marine glue—the four-inch fin slots into the two-base mount and is removable for storing.
Table of Contents
Hard Shell Kayak: Adding a Skeg
-
Step 1: List of Materials
- Sandpaper
- Drill – optional
- Soft cloth
- Paddle Leash – optional
- Marine Glue
- Hair Dryer or Heat Torch – optional
-
Step 2: Mounting Location Selection
You want to install the skeg in the center kayak’s keel. Turn the kayak upside down to locate the best spot on the keel. Mark this with a pencil if needed.
-
Step 3: Sanding a Surface
To get the best gluing surface, sand the spot where you are going to glue the skeg using sandpaper.
-
Step 4: Dust Removal
Remove all the dust from the keel with the soft cloth to ensure the nest surface to apply the glue
-
Step 5: Heating the Hull
If your kayak is Polyethylene, you should heat the keel for the best glue adhesion.
-
Step 6: Using Marine Glue
Apply the marine glue to the keel and press the mounting base (bases) onto the keel. Applying weights for pressure will ensure the mounting base adheres well to the keel.
-
Step 7: Fin Attachment
If your skeg fin is removable. Apply it after the glue is completely dried by sliding or attaching the fin to the mounting base.
-
Step 8: Leash Attachment
A paddle leash keeps track of the fin; if it comes loose from the mounting, it gives you a way to retrieve it. Just drill a tiny hole in the fin and attach the paddle leash.
Inflatable kayak: How to Add a skeg
-
Step 1: Front and Rear D-Rings String Attachment
Attach your string on a D-ring, extend it to the other D-ring, pull it taut, and tie it off.
-
Step 2: Lay Down the String with the Template on Top of This
Once the string is in place, place the template on top of the string.
-
Step 3: Position the Template Correctly and Tape Into Place
With the template in place, use a measuring tape and measure 25 inches from the stern end of the floor pocket.
-
Step 4: Using a Pen Trace the Inside of the Template
Tape the template in place at the 25-inch spot and tape the template to the kayak,
Using a Sharpie, trace on the inside of the template (this is where your patch will go.)
-
Step 5: Put the Template Aside
Remove the template; you should have an outline to place your patch.
-
Step 6: Put the Patch on Correctly
The patch will be marked “stern end” this is the end of the template that should face the stern.
-
Step 7: Marking the Boat and the Patch
Mark the kayak and the patch with a line to match up to ensure your patch is in the correct spot and position for later.
-
Step 8: To Protect the Boat, Use Making Tape
Placing tape on the kayak will protect it from the extra glue used to secure the skeg; using masking tape, tape the outer lines of the patch you just traced on all four sides.
-
Step 9: Cleaning the Area
Using denatured alcohol and a soft cloth, clean the area where the patch will be glued. You will do the same thing to the side of the patch that will be glued to the kayak.
-
Step 10: Scuff the Area
Scuff the patch area using sandpaper to create a rough surface for the glue to adhere to. However, DO NOT scuff too hard. Once the site is scuffed, go over it again with the denatured alcohol and soft cloth to remove any debris.
-
Step 11: Brush a Layer of Glue on the Kayak Surface
Brush a layer of Stabond Glue onto the spot where the patch will be placed.
-
Step 12: Apply a Layer of Glue to Your Patch
While the kayak is drying, scuff the side of the patch that will be glued to the kayak, then using the cloth and alcohol, remove the debris from the patch.
-
Step 13: The Glue Needs to Dry
The glue on the kayak and the patch need to dry for 25 – 30 minutes.
-
Step 14: Apply a Second Coat
Apply a second layer of glue after the first layer is dry (about 30 minutes)to both the kayak and the patch and allow the layer to dry for 30 minutes more.
-
Step 15: Using Your Marks to Apply the Patch
Using the marks you made on the patch and kayak, lay the patch in place, ensuring the lines are matched up.
-
Step 16: Getting the Glue Hot
Using a heat gun or hairdryer on hot, lift half the patch and get the patch hot enough that the glue on the kayak and patch are tacky. Press that half of the patch onto the boat and rub to ensure they are glued together without air pockets between the layers.
Pull up the other side of the patch and repeat the drying process. Warm the top of the patch until it is uncomfortable to touch.
-
Step 17: Curing the Glue
Remove the tape and let the glue cure for 24 hours.
-
Step 18: In the Bow-End Pocket, Slide in the Skeg
After the glue has dried for 30 minutes, slide the skeg into the stern pocket, slide the skeg back into the bow pocket and slide the skeg backward until it is in place. Your new skeg is ready to use!
How Do Crosswinds Affect the Skeg’s Position
Crosswinds will cause your kayak to weathercock; you will have to adjust your skeg to counter-act the weathercocking.
Finding the Right Position on your Kayak Skeg
Skeg position is determined by the winds, the calmness of the water, and the length of the trip. You will have to experiment in these situations and see what works best using the skeg.
Kayak Rudders vs Skegs
Kayak Length
You will need a skeg if your kayak is very long, it may need 1 – 3 skegs, depending on where you will kayak.
A kayak used for touring and on the ocean will have a skeg or a rudder useful in these waters.
Kayak Use
Short kayaks used for recreation do not have a skeg. Whitewater kayaks do not have a skeg, but a removable skeg can be added
Hull Design
Inflatable kayaks have a flatter hull that requires a skeg. It can have a larger removable skeg, a smaller skeg, or a permanent skeg attached to the kayak at purchase.
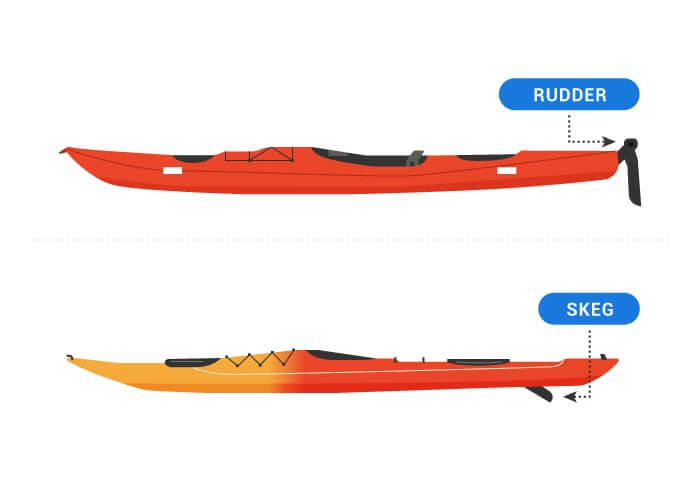
Differences between Rudder and Skeg
-
The Fit of The Paddler
Skeg Kayaks tend to be slender; their snug fit means more of the body comes in contact with the inside of the kayak, and the decks are lower. This type of fit is needed to allow the kayak reach the speed it may need.
Rudder Kayaks have a broader and higher deck, creating less body contact with the kayak, requiring them to use the paddle more. The kayak edges less because of this.
-
Folding Option
When you are in shallow water or a gravelly bottom water, the skeg can fold (go up into the skeg box) to avoid breaking or losing the skeg.)
-
Stern Space
Skegs (on kayaks manufactured with skegs) store in the kayak’s hull a few feet in front of the stern.
Rudders are mounted on the stern or in the back outside the kayak, leaving room to store things in the hull.
-
Damage Chances
Skegs are less likely to be damaged due to the folding option.
Rudders are on the outside of the stern and are easily damaged by other kayaks, rocks, and shallow water bottoms.
-
Ability to Control
Skegs assist the paddler in edging for better control.
Rudders make it easier to control the kayak as there is less edging to do.
-
Drag
Skeg boxes create a slight drag in a kayak.
The rudder being out of the water eliminates drag
-
Wave Effectiveness
Waves have fewer effects on the stern of a kayak with a skeg, opposed to the stern of a kayak with a rudder.
-
Cost
It costs more when maintaining or installing a rudder than a skeg, because it has cables and more moving parts than the skeg.
-
Retractability
Rudders need to be locked after being pulled out of the water/unlocked to be put back in the water; a paddler may not be able to do this alone or quickly.
Skegs are quickly pulled into the box using a cable or leash.
-
Installation Cost
Rudders are much more expensive to install than a skeg.
Tips for using and maintaining Your Skeg
- Lock the removable skeg in the fitting so they do not get lost or come loose.
- Inflate the kayak to the correct PSI, so the tracking fins do not wobble.
- Skegs break easily; watch the back-end of the kayak at all times.
- Get out of the kayak Before you get to shallow or rock bottom areas to protect the skeg.
Putting Away the Kayak
When choosing if you need a skeg on your kayak, knowing how and where you are using the kayak will help you make that decision. Using the information above will help you choose whether a skeg is a good choice on your kayak.


Leave a Comment