
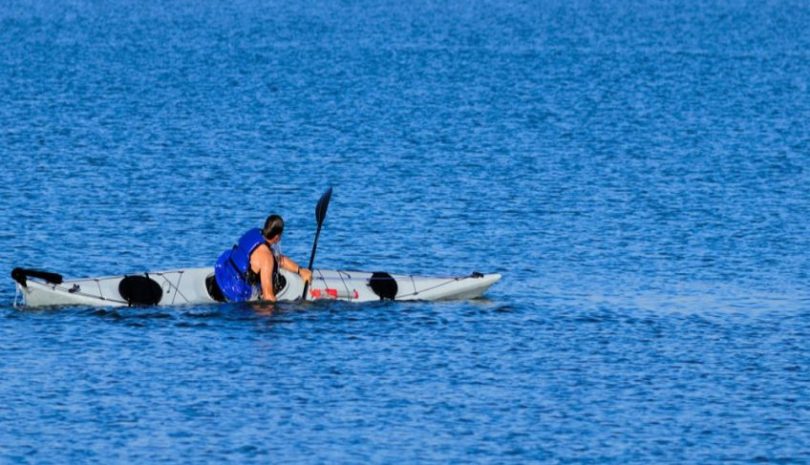
This is the part of kayaking that is no fun. But it can happen. Strong currents, big waves and an excess of weight are contributing factors. Kayaks are inherently stable but accidents do happen. Importantly there are three things you should bear in mind when in an adverse situation- be calm; always do a flotation device and focus.
Practice wet exits, rolling over upright and reentering your kayak in calm waters. It will come in handy.
This guide will walk you through many smart techniques on how you can recover your kayak. Try and get familiar with as many as you possibly can.
Table of Contents
Assisted Kayak Recovery
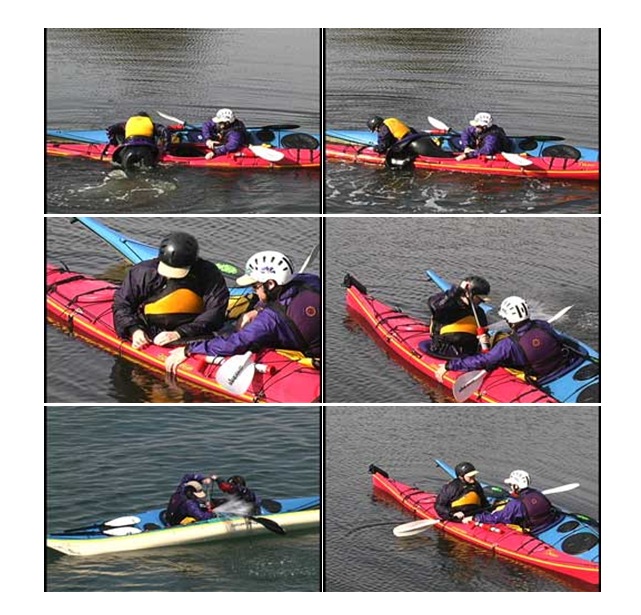
1. Eskimo Bow Recovery
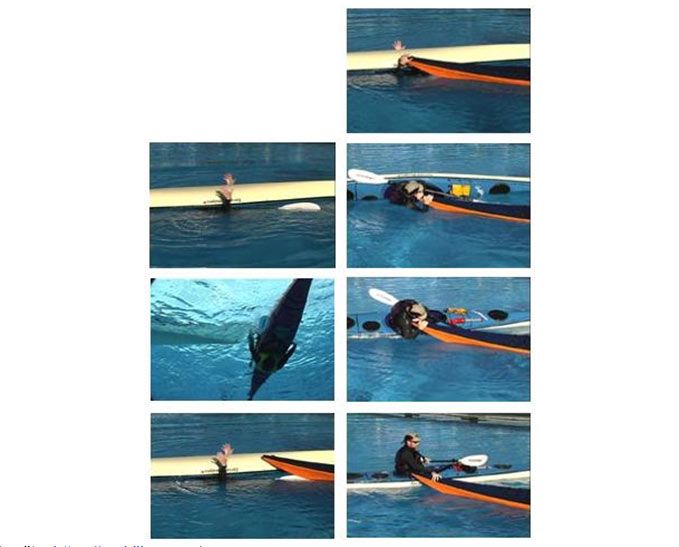
In cold water, exiting the kayak is not a good option. This technique calls for assistance from a partner in another kayak. This technique is an old one going back to the invention of kayaks. Today, exiting wet is simpler especially if you have an immersion suit on.
This is how it’s done:
- Lean forward as close as you can to the front deck
- Reach out with one hand on each side of the kayak to guide your partner into position. The goal here is to grab the bow.
- Keep your hands moving.
- Once you have the bow in your hand begin to pull yourself up.
- Bring your opposite hand also onto the bow.
- When both hands are on the bow, pull your head up.
- Roll upright.
2. Eskimo Paddle Recovery
A variation of the above bow recovery technique is the paddle recovery.
Instead of getting hold of your partner’s kayak bow, here, you use his paddle that is positioned spanning the bottom of your kayak.
Once the paddle is in your hand, you begin to pull yourself upright. When the paddle is within reach of the other hand, hold on with both hands and rollover.
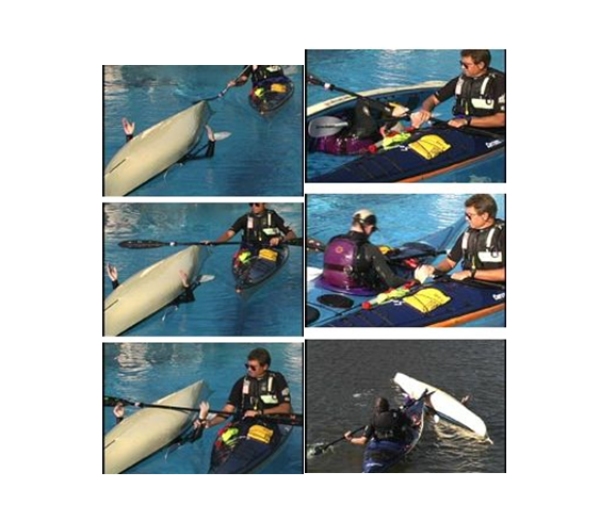
3. Hand of God (Hand-up recovery)
This technique could be a recovery and also a rescue. The “Hand of God,” is an apt name for this technique if the kayaker is unconscious as you have little time to get the kayak upright. But it is not easily done. The weights and kayak designs may differ which makes a heck of a difference.
To pull it off, you need to commit your weight to the capsized kayak.
This is the way it’s done:
- If the paddler is conscious, reach over to the far side and take his hand.
- If the paddler is unconscious, grab hold of the far edge of the kayak.
- At the same time as you haul up with this hand, use the other to push down on the hull close to you.
- Focus all your strength and energy on rolling the kayak over. Use any means such as getting a hold of the paddler’s clothing, leaning away, and so on.
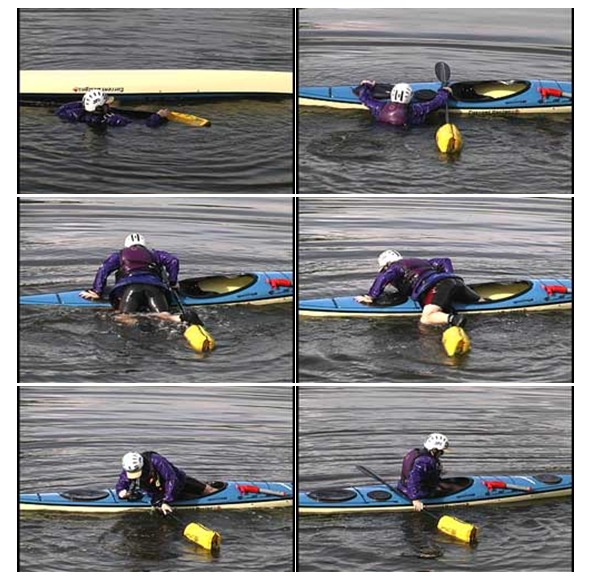
4. Wet Re-Entry and Eskimo Bow Recovery
This technique is a combo of the bow recovery and wet re-entry.
Once the kayak has overturned, the paddler makes a wet escape till a helping kayak is at hand.
Once the helper is positioned, re-entry into the upturned kayak is made. Thereafter the bow recovery maneuver is made to roll upright.
The biggest advantage here is that you stay in control and communicate to the aider beforehand. The big deal is re-entry. This is what needs a little practice beforehand.
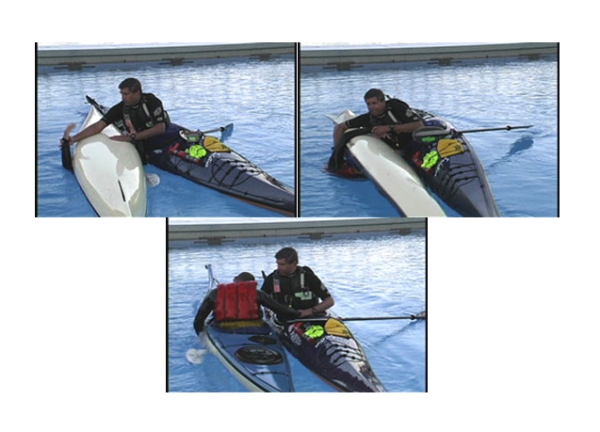
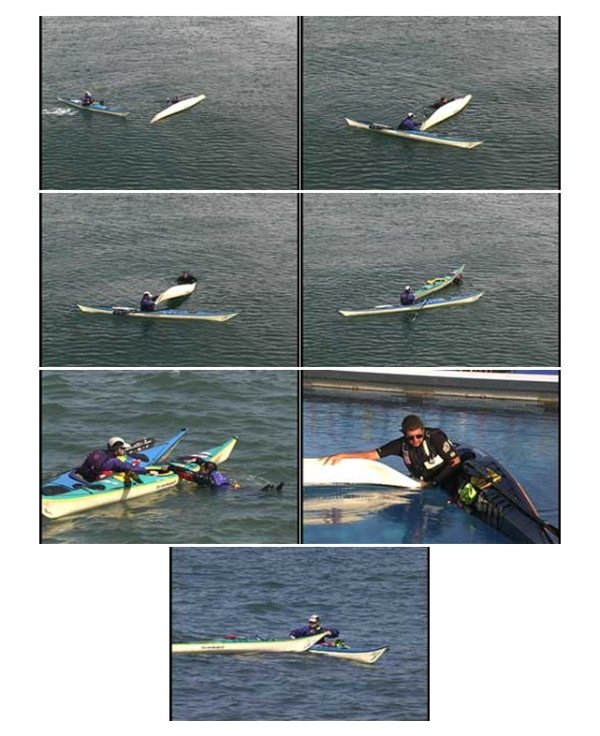
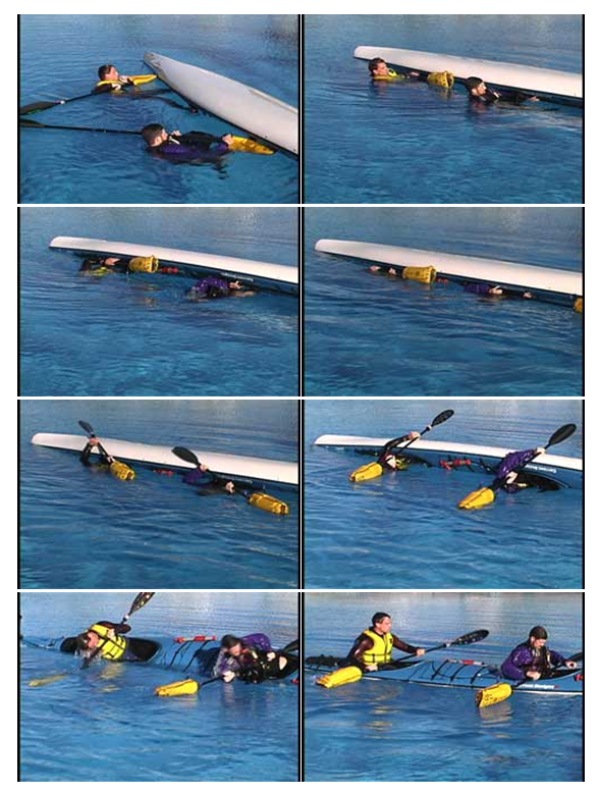
5. Dual Wet Re-Entry and Eskimo Recoveries (All-in Recovery Variation)

The way out of any situation where your kayak has flipped over is a solo recovery. An ‘All In’ situation arises when both paddlers are in the water after capsizing. If one could do a solo recovery, he can assist the other by the reentry and Eskimo recoveries.
As shown, here is an ‘All In’ scenario where a solo recovery is not possible. One of the paddlers makes a wet re-entry. First he needs to get hold of the end of the other overturned kayak closest to him. Pushing down on it, he can now rollover. The paddler in the water keeps the kayaks together.
Once the kayak is upright, no doubt it will hold water but bailing out the water can wait. It is important to minimize exposure time for the paddler in the water. He can now also reenter his kayak with you executing a paddle or bow recovery to get the second kayak upright.
Now the water can be pumped out of each kayak. Remember to support the kayaks using the paddles as bridges.
6. Dry Re-Entry and Pump
Of recovery techniques, re-enter and pump is the most basic.
The recovery begins with getting the kayak upright first. This can be done by the paddler in the water, by the assister, or by both.
Performing an assisted re-entry, your task is to stabilize the kayak while the paddler in the water gets into his kayak. The back deck is preferable for this. The kayaks should be facing in opposite directions so that the paddler assisting can see the paddler in the water making the re-entry and direct him if need be.
Once the paddler is safely seated in his kayak, the pumping out can begin.
7. T-Recovery
In T-recovery water is pumped out of the kayak before the paddler gets back in. This recovery technique is only possible if the kayak has a rear bulkhead behind the seat. The assister lifts the bow enabling water to drain out.
It may not be possible for one person to lift the bow up, especially when the kayak is swamped.
The paddler in the water pushes down on the stern which will make it easier to get the bow up.
Once water is drained out, with the bow held high, the kayak can be rolled upright without scooping water.
8. TX-Recovery
A T-recovery where a kayak has no bulkheads becomes a TX-recovery. Hence, just lifting the bow is of little use as the trapped water will simply rush to the stern.
Here, a seesaw motion is made use of to get some of the water out. The second part is quite a challenge. It involves getting the bow onto the deck of the upright kayak. The paddler in the water keeps up the seesawing motion.
Once the bulk of the water is out, the kayak can be rolled upright.
These days seldom will you come across a kayak without bulkheads so this recovery technique is mostly redundant.
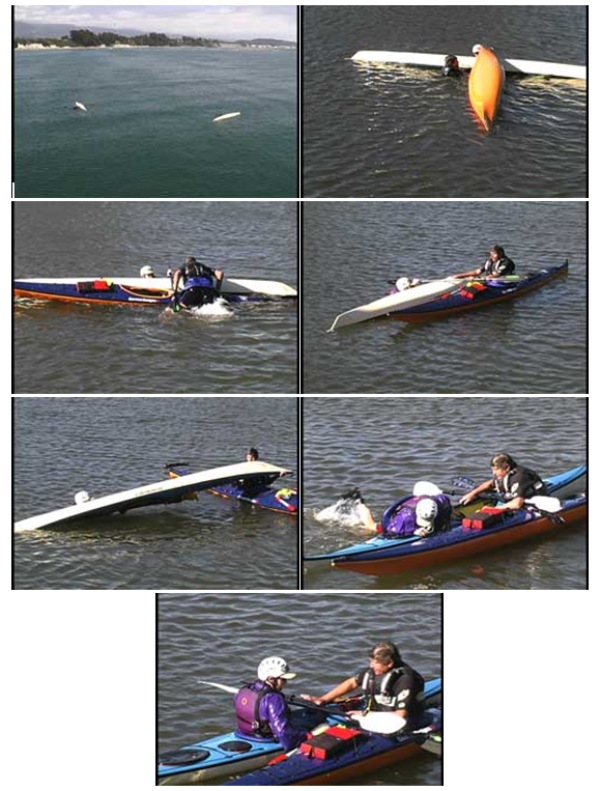
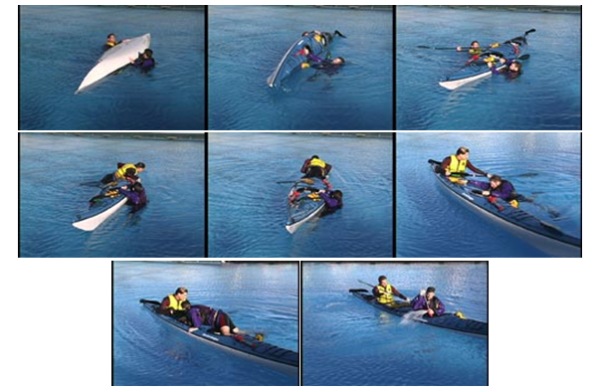
9. Cleopatra’s Needle w/Curl with TX-Recovery
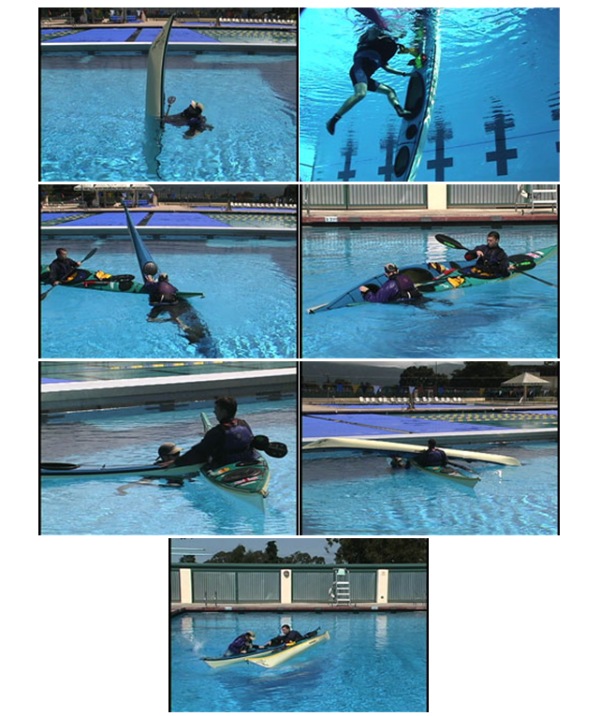
In days gone by, kayaks did not have bulkheads. If your kayak capsized, there was little you could do except make a wet exit. Sometimes air trapped in the bow or stern would cause the kayak to stick out pointing skywards as shown.
In case you are wondering about the name, there is an obelisk on the River Thames Embankment in London called Cleopatra’s Needle.
Getting back to the recovery:
- you need to keep the kayak in this position till help arrives. Luckily it acts as a beacon at water level and assisters can see that you need help from a distance off. You can hold on to the cockpit coaming or a deck line.
- When help arrives get hold of the bow of the assisting kayak. This is the platform you will be using.
- Without losing your grip on your kayak, lie over the assisting kayak. Drag the bow down towards the surface. The trapped air will escape.
- Once level with the surface, get the water out by rolling the kayak.
- Using the curl method (imagine doing a dumbbell curl) repeat the motion of holding the coaming and drawing it towards you. Water will spill out. The bulk of the water is drained this way.
- Once the kayak floats level, your partner shifts to a ‘T’ position.
- Since the water is in the bow and stern pockets, proceed with a TX-recovery.
- Once all the water is out, the assister keeps the kayak stabilized while you re-enter.
10. HI-Recovery
H I. The name comes from the positioning of the kayaks during the draining process.
The “H” is two kayaks bridged by paddles. The “I” is the overturned kayak. This is more a flooded kayak draining method.
Two kayaks used to drain a third in our case. The recovery here depends on the strength of the paddles. They are used here to take the weight of the overturned kayak. The present-day ultra-light paddles will give way.
The draining process is for kayaks without bulkheads and so the seesaw method is employed.
You have two paddlers working in tandem. They need to be quick. The third person is in the water.
- The paddles are positioned in place by kayakers with their outside hands.
- Using the inside hands, the bow of the overturned kayak is hoisted onto the paddles.
- When the bow is lifted, one half of the kayak is drained.
- Keep pulling the bow further onto the paddle bridge till it is hanging balanced. This will not be easy as the surface you are dragging up is the top deck which is not a flush surface.
- Now using a seesaw motion drain out all the water. This will not be necessary if there is a rear bulkhead.
- Poll over the kayak on the paddle bridge. Slide the kayak back into the water.
- Stabilize the kayak so that the third paddler can re-enter.
11. Stirrup Recoveries
Technically the stirrup recovery is a re-entry technique.
It comes in pretty handy when the person needs to re-enter by giving him a stepping alternative. This could be useful if the paddler is exhausted and lacks the upper body strength to re-enter using the usual methods. He could even be hurt.
There are many different ways a stirrup could be put to use. We will look at one called the “coaming loop.” It is easy.
The stirrup is wrapped around the coaming of the kayak that is to be re-entered. The length can be adjusted using suitable knots.
- The person in the water faces the coaming.
- Put the foot nearer to the stern in the loop and at the same time grab the far coaming.
- Pull your upper body out and lie on the kayak. You will be facing towards the stern.
- The other leg goes into the cockpit.
- Once both legs are in, rotate your body and settle in the seat.
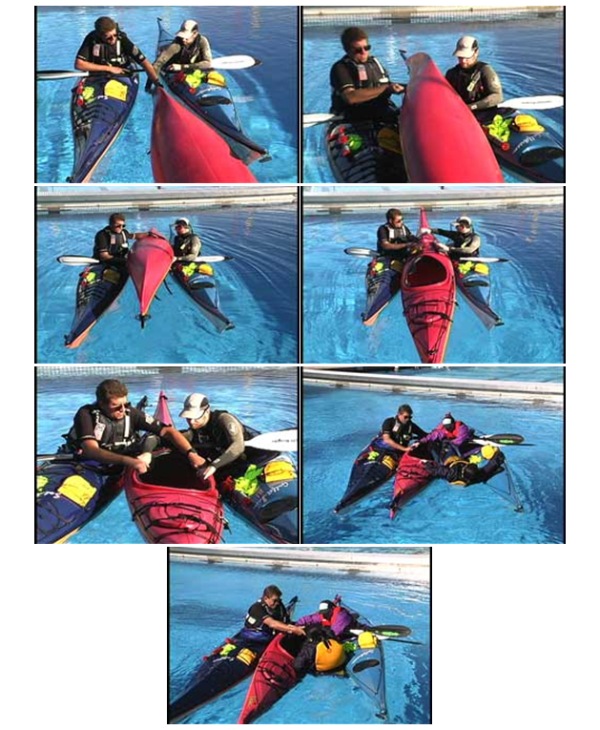
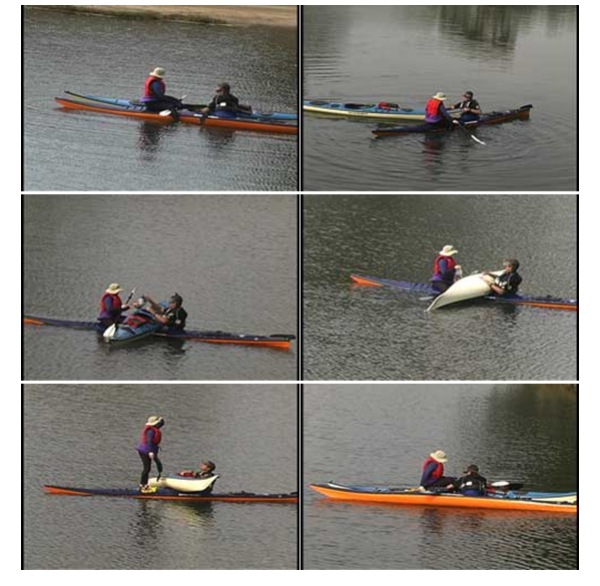
12. All in Recovery (Traditional)
We have already dealt with the “All In” situation. The traditional variation differs in that no pumps are available so one kayak is first drained by pulling its bow upon the other as shown. After that one paddler re-enters.
Using T-recovery, the second kayak is drained. The second paddler makes a re-entry while you stabilize the kayak.
13. On Water Repair
There will come a time when you need to carry out repairs while floating. There is always scope to improvise as you deem fit.
The basic way is like this:
- Vacate your kayak and climb on the assister’s bow deck.
- The assister now positions his kayak to a “T” configuration.
- Get the bow of the damaged kayak onto the assisting kayak between the two persons.
- Bring out your repair kit.
- Roll over the damaged kayak so you can access the damage.
- Carry out repairs.
- Righten the kayak and reverse the process to refloat your kayak and re-enter.
14. Utilizing the Group
When kayaking with others do think of ways to utilize their support if the need arises. The hardest part for a person in the water is getting back in.
Two types of assistance may be required by a person trying to get into a kayak from the water. One is someone to stabilize the kayak or it may roll over. He may be exhausted to do it on his own. A second helper needs to pull him onto the stern deck. With the kayak being stabilized, this gets far easier.
Draining a kayak without assistance is near impossible without assistance.
Solo Kayak Recovery
1. Extended Paddle Roll
This roll is especially suited for sea-kayaking.
The directions that are given here are solely for guidance. You will need to practice this important move to perfection.
This is how it goes:
- Tuck forward. This will get you closer to the surface. Also, tuck towards the side which you will roll.
- With hands in the normal paddle position keeping both hands out of the water and paddle pointing skywards.
- Move the paddle into an extended position with the leading blade flat on the surface.
- Start sweeping the blade in a bow to the stern direction. Lift inside knee at the same time.
- The knee lift is the key. Do not lead with your head when doing this maneuver.
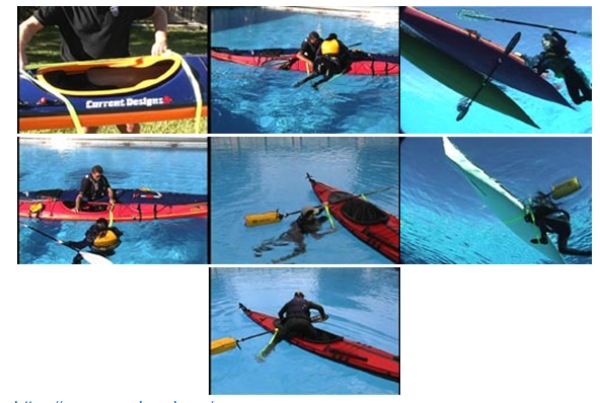
2. “Back-Up” Rolling Aid

If you capsize, let’s see what your options are. A solo recovery, assistance for an Eskimo recovery, or a wet exit. The back-up roll offers a darn good alternative. It is mounted on the front deck easily within reach. Let’s check it out.
- When turned over, grab the handle of the pack and pull.
- The flotation bag is released which in turn triggers the release of CO2.
- The flotation bag fills up and there is a good deal of flotation available.
- Reach out and push down hard on the bag.
- As you get upright pull the bag closer to the kayak so you can get your body into the cockpit comfortably.
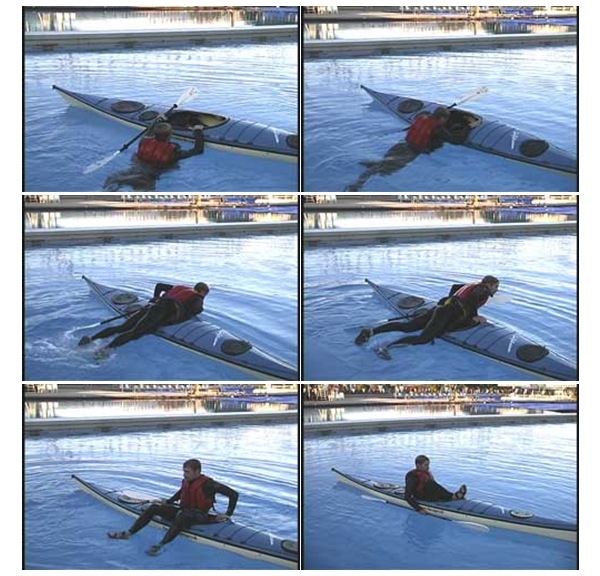
3. Wet Re-Entry and Roll
Another great solo recovery option is this technique. The name can be a bit confusing. If you know how to roll, why go for a wet exit and a re-entry? Well, put it down to a practical understanding of the situation. Many experts have put their heads together and found it is a great deal easier to wet exit and re-enter. The roll follows.
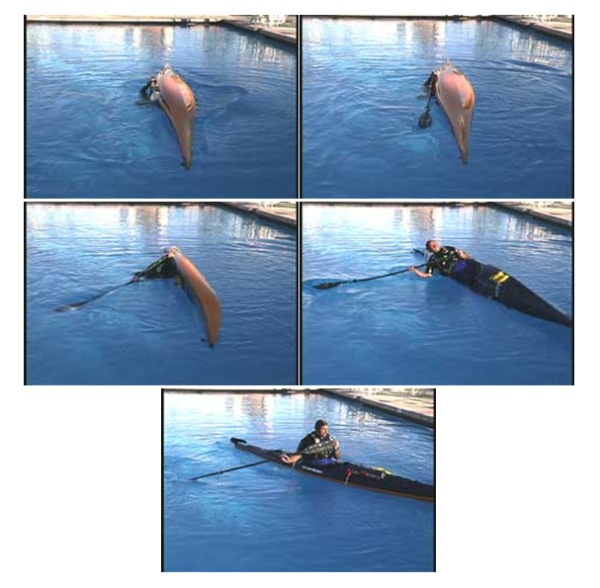
4. Paddle Float Recovery
This technique is by far the most effective in doing a solo recovery.
Okay, your canoe has overturned and you have made a wet exit. What next? In any solo recovery, stabilizing the kayak for re-entry is the tough part. For this, you will need a flotation bag and some line to fasten the bag onto the paddle.
- Once in the water, you need to get out the flotation bag and some rope stowed for this very purpose.
- Secure the bag to the end of the paddle.
- Inflate the bag. Flip the kayak upright
- Re-enter from the stern deck.
5. Wet Re-Entry and Roll With a Paddle Float
This technique is a modification of the standard paddle float recovery shown above.
The difference, make a wet re-entry before inflating the bag strapped onto the paddle.
6. Paddle Float With Stirrup
Yet another version of the basic paddle float. This technique is a rescue mostly. It is used with a stirrup where you have a paddler in cold water. Immersion beyond a certain time triggers hypothermia.
This is a solo act and you need a stirrup or sling in your locker. Also a good strong paddle.
7. Scramble Recovery
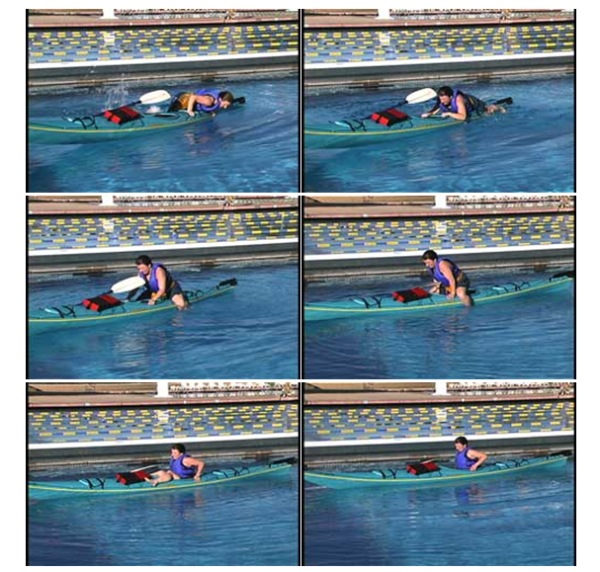
Mounting a kayak has always been pretty tricky. This method sharpens your sense of balance. Practice this hard as has to be a fluid, smooth coordination.
8. Side Scramble Recovery
This technique is an alternative for scramble recovery.
Since you will be hauling your body across the kayak in one move, you have to be superbly athletic to pull it off.
Once you are straddling your canoe, balance comes into play. The sweet spot is in how your head is positioned. Too far back and you topple off. Too much forward, the kayak will turnover. So know your kayak and things will work out just fine.
9. Paddle Swim
This is, in our opinion is mighty important, and why?
Some coasts, we can come up with California for instance, are subject to weather and wind conditions. A paddler who somehow gets displaced from his kayak will have a pretty hard time swimming after it.
The paddle swim comes into play. Like any technique, it has to be practiced. The entry blade angle is the key. Master it.
Now that you how caught up with your canoe, re-enter and we are good.
10. Swimmer Assists
Out there in the water, it’s a possibility that another fellow kayaker is stranded after his boat capsized and sank without hope of recovery. You need to help out the hapless swimmer. This can be done in three ways to get him ashore.
One: gently nudge him shorewards. Two: Tow him and importantly, the last alternate, to carry him on the stern deck.
The last option can cause problems centered around balance and stability. This should be done under control.
Double (Tandem) Kayak Recovery
1. Dry Re-Entry and Pump
This technique involves a double canoe, meaning two persons paddling one canoe. It is a lot heavier, longer, and requires some effort in getting it upright. On the plus side, stabilizing a kayak to climb into is difficult. A partner who can do that goes a long way.
Have control over how you get the tandem kayak upright. The slower, the better because the water can get drained out as much as possible. Once the kayak is upright, the rear paddler should re-enter first. He can then keep an eye on the front paddler as he re-enters making suitable body shifts to balance and stabilize the kayak.
Pump out the remaining water and move on.
2. Paddle Float Recovery
This maneuver is a back-up for the double re-entry and pump technique described above. It would figure in a situation where your partner for whatever reason cannot contribute to the recovery. He could be exhausted, hurt, or even seasick.
The solo paddle float can be employed to get the kayak upright.
Re-entry is much simpler as two persons are involved, one on each side.
3. Paddle Float Rolls
Wet re-entry for a double kayak? Yes, it can be done quite easily. Take a look at the sequence of steps that go into this technique.
Here, the key is communication and tandem work. Uprighting the canoe is pretty rapid and this is quite important in cold waters. It requires a wet exit and a wet re-entry. But, it’s worth the discomfort.
4. T-Recovery
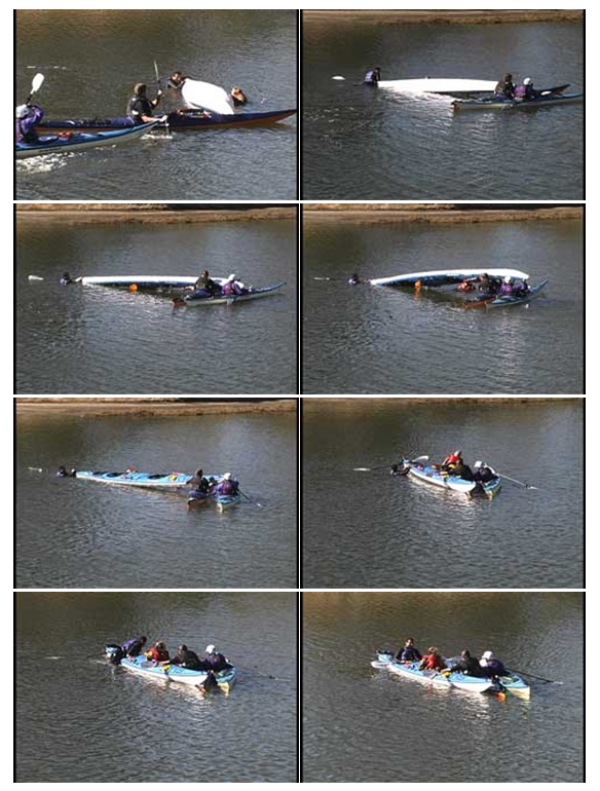
A double kayak presents advantages and challenges as well when it comes to recovery. Assisted recoveries performing T-recovery calls for two single kayaks helping out in the pumping and uprighting process. A T-recovery is chosen as water can be drained out quickly or, a pump is unavailable.
- The two singles approach the bow. One will lift the bow and the other will stabilize the lifter as well as help in getting the bow up.
- The double is tilted slightly to break the vacuum seal which makes it easier to get the bow out.
- To drain the water from the stern cockpit the bow of the double kayak has to be pulled up onto the assisting single holding the bow.
- Once the draining is done, the tandem can be rolled upright and slid back into the water.
- Keep the tandem stabilized as the paddlers make a re-entry.
Sit-on-Top Kayak Recovery
1. BBF Recovery
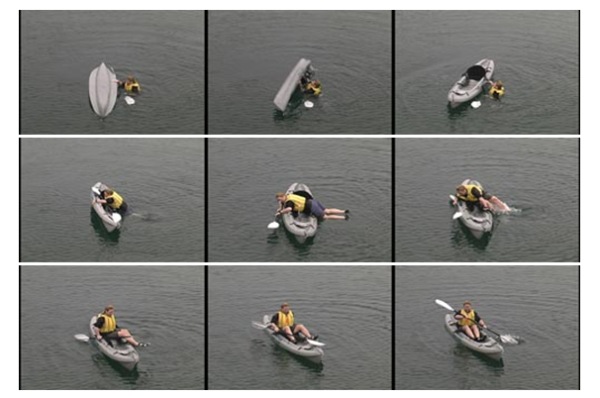
Sit-on-top kayaks have a clear advantage over the traditional closed-deck kayaks; there is draining out involved. It comes down to flip upright, re-enter, and get moving.
Sit-on-top canoes are wider for more stability so a little more energy is required in the uprighting motion.
2. Scramble Recovery
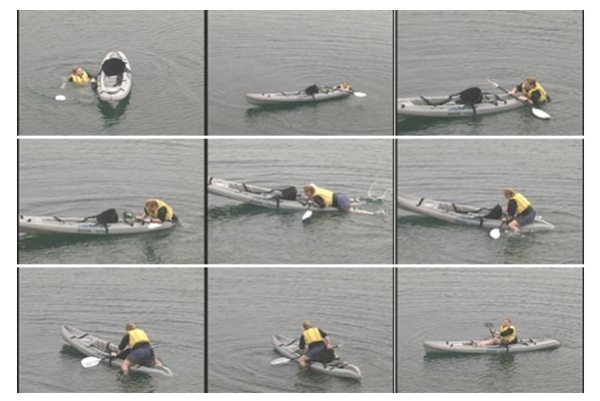
It is important to keep your kayak under your control. On a windy day, it can shoot away quite fast. Thigh straps, backrests, and deck lines can be used to hold on to the kayak.
Getting back on-board can be a bit difficult with sit-on-top kayaks as they have a greater freeboard.
Re-entry will be from the stern deck as shown.
Conclusion
These kayak recovery techniques mentioned above have been carefully put together with 2 primary goals in mind: 1) To minimize the exposure time in the water and 2) The recovery should have the paddler make his way back into the cockpit with the kayak being seaworthy.
We have seen the immense role played by assisters. Do not be a passive onlooker when you see somebody trying a solo recovery. Render assistance.
Most importantly, practice and more practice on these techniques in still waters till you get it down perfectly.
Happy kayaking.

Leave a Comment